So at the start of this project i wanted to design an area that was created around four different cultures. I feel i achieved this goal, i have created a scene that encompasses the essence of these cultures. Overall i am happy with my progress in designing a 3D space
So i have compiled everything for hand in tomorrow, everything is fine except one aspect. The packaged version has a few issues, the package project on personal works fine alongside other computers. Yet when i tried to bring my package to university the level is nearly pitch black. The lights are working compared to what they were on other computers is a drastic difference. The level is shown as intended throughout the two videos, yet when packaged and played at university the lighting is a huge issue. Due to this i am going to attach a read me to the hand in folder outlining this problem and exsplaining the reason for the lighting not machine the lighting shown throughout the showreel.In total i have tried running four different packaged versions of the level to try and rectify the lighting. Each
Some of these are improvements yet lack lights in certain areas. (primarily the Egyptian area) I have tried opening the project at uni and packing it there yet have only experienced crashes. This is a huge disappointment at this stage, and i hope it will not affect my marks too much, this issue is the bane of my project for me at this point. If this problem persists I'm tempted to use my own computer at the degree show to have the walk around as the lighting will not be an issue there.
Another issue for my package is the lighting error that shows at the top of the screen this is because some assets i have readjusted due to black marks appearing over a few of them, I believe that this is not due to my work as a lot of the time it is the rocks placed in the Norse area, that suffer from these black spots appearing on the lightmap.
My issues aside i am still thrilled with myself at this point. I am pleased with my newfound knowledge within this practice and I believe this project has gone really well. I am pleased with the video content, alongside all the documentation for my submission but most of all im proud of myself for my own work ethic and I'm impressed at myself and am excited to start my new project.
This is my final blog post, to keep up to date with my work please go to.
So i have reached my last month, this was my own set deadline of when to finish all my assets and start unreal work. At this point in the project i want to reflect personally about how i felt the project has gone over the last few months.
Overall i am very very pleased with personal improvement and understanding of software, work pipeline and asset and environment design. I have learnt and applied myself in areas that i was previously unsure about, i have used Ncloth and dynamic physics in maya numerously. Have improved on UV unwrapping and texturing, photoshop paths, NDO pipeline and blueprint and material editing in Unreal.
This being said i am still frustrated at aspects of what i have achieved and parts of my work, i feel going back i could improve a lot of my earlier assets vastly. I also felt i overestimated how difficult some aspects of this project would be, such as the skybox. An aspect that i fear i will not have time to complete now, other aspects such as importing skeletal meshes correctly into unreal has caused a lot of frustration without much gain. A skill i plan to master at a later stage, alongside the aspect that i did not have enough time to design my own foliage, so am debating using foliage from the unreal marketplace. Yet thanks to Unreal releasing assets from there kite demo for free has relieved me greatly; i am stll very disappointed with not being capable of designing my own, yet another skill i will spend time learning in the future.
This self criticism aside i am very impressed with the range of assets i have made, which are culturally accurate. I am very impressed and pleased with the work i have put into this project. I am also very impressed with my own work ethic spending every day since its beginning working constantly. To learn new skills and design interesting and different assets. So in all very mixed feelings about how my project has gone at this point in time. Now i am focusing on my last month i have alot of work to do. Understanding Unreal Engine and consideration on how to present my level and final handin at the end of the month. I am also thinking heavily about handin and handin format, now that i am near the end of my project. I am thinking about making a leaflet or spread on design of this area. For the next week i want to focus on these key aspects.
Brush testing
Brush choices
Landscape Matierial
Landscape sculpting
Prop placement
Use of assets that are not my own (copywrite and thanks)
Lighting
Video footage of level using Maintnee (Unreal - Rendering)
Leaflet design
Assets that need improvement/ redesign (If time presents itself)
Anubis wall (egyptian Area)
Pillar smoothness and texture (Egyptian Area)
More flavor in the norse area
Remodel the ship
Foliage Design
Spacebox design (skybox)
Paricle effects
Water effects
Due to the number of assets and other aspects i would like to complete i will not be able to add all these aspects and may need to turn again further to the unreal store to achive the effect i set out upon. I am going to discuss with my tutors now what would be the best corse of action would be from here on out.
Brush Testing
After looking through unreal i decided i should use some of my student finance to buy the grass and rock pack available from the unreal marketplace, using the free kite assets aswell i started brush testing in Unreal. I am very happy with the results and have learnt how the foliage tool can be used to manipulate density, scale and offset for any static mesh you place with it. By adding some of my own assets i tested what sort of scenes i could make with a few environment peices of my own and other aspects that unreal has to offer. Im really happy with the scenes i can make yet still slightly disheartened that i cant take credit for everything in this scene. I am also going to take this opportunity like i have many times before and say how much i am enjoying using unreal 4.
Landscape sculpting and base landscape material
Creating landscape was always one of my main goals so i set aside my first week laying out my landscape i first tried adding using the paint tools in unreal this required setting up an enviroment material as shown below. However this method created a huge tiling problem with the various paint layers. In my personal opinion it seemed unprofessional so i started researching into new ways to texture my landscape
Environment material - not used due to tiling problem
After looking around i found a new way to create my lanscape matierial by following a tutorial from rats games (link shown here)
This helped with designing my original landscape material. Yet required quite a learning curve to understand blueprints in unreal and how i can alter them.
The method that i am using is more focused on slope depth as a pose to paint, and will act as a material variable allowing me to alter aspects of the ground and environment easily and quickly for this project and future projects.
The first stage of this was creating a blend distance for each texture i was going to use. As i planned to use four textures per area i ended up creating 16 blend distance material blueprint. Each blend distance exsported a base material and a heightmap, an exsample of what the blend distance blueprint is shown below.
Blend distance Blueprint
Slope Material for landscapes
By using the heightmaps and normal material exported from the blend distance material i started creating a slope environment blend material. This would incorporate four materials and place them accordingly depending on the angle of a slope that i has been sculpted. In total i am using four of these slope materials, by creating the blueprint i can then form into into a material instance which gives me a clear menu of falloff, blend and distance controls for my landscape.
Material instance
This technique has been fun to learn and has offered a range of personal insight into blueprint editing in unreal. Below is a video of both the failed environment painting and the successful Slope material and how easy i can modify my environment because of them. At this point i would like to thank Rats games for teaching me this valuable tool for unreal.
Overview of each area and prop placement.
So after i have sculpted and placed the majority of my props i decided to look at some of unreals environment design videos i have found four video examples of how some other environment artist use unreal quickly and effectively. From watching these videos it showsof how a couple of designers have used free and marketplace assets in unreal to create interesting looking enviorments; using the tools Unreal has to offer. From watching these i have discovered a few aspects that i need to master
Paths In unreal used for roads rivers and paths
Adding small paint layers onto my environment
Scaling and morphing assets (rocks) to create intering mountain and declas.
Creating interesting shapes out of stone and using them as a bases for the enviroment
Light color and consideration
Particle effects such as fog and steam to bring out some areas
Brush tools. slight alteration of materials such as Water shaders to achive desired effect
After watching these videos i wanted to test morphing rocks into aspects of the level because of this i ended up designing a small mound out of rock for tha native american area and added some of my own assets to the shot.
Along with some ground foliage this technique should look effective, i have noticed after all the videos i have watched constant tweaking and changing aspects of the environment make a coherent level with a interesting environment.
Alteration of rock formation in unreal, i felt that the top would be to heavy to support and i wanted a small set of steps leading to it so it can resemble the christian alter.
After playing with the material functions i have discovered a way to add an overlay effect for base materials this means i can alter the look of the free unreal rocks and give them a color overlay to fit each area.
This was use of applying my own knowledge of the blueprint editor now, yet have seen the proccess used in some of the tutorials above. Yet this has quickly allowed me to change the style of an asset quickly. (shown below is an exsample of testing blend overlay on the free content in unreal.
This tequnquie will be used further to broaden the variety of all assets if i think it is an effective result.
Using Matinee and video tutorials
This morning i spent my time trying to understand the matinee tool, searching video tutorials, understanding what is capable and effective. Alongside export formats and compression problems. From watching a set of tutorials by Dave Wilson i have leaned and understood these aspects
Camera addition and matinee
Adding key frames
Movement of camera
Field of view controls
Using the curve editor to smoothen out some imperfections of the video
Controlling camera paths in a 3D space
using director to compile various camera footage together
One of the big aspects that i wanted to focus on at this point. Was redesigning some assets im unhappy with, the egyptian wall weighing of the heart was one of these assets. I decided to go back and clean up my original artwork of the weighing of the heart, and remade the normal sheet. The effect is alot better, on the right is the old version that i felt was too dark rough, and messy. The clean/new version is shown on the left.
Weighing of the heart
By understanding how to manipulate cameras in Unreal i plan to add a start sequence showing off some of my area/assets in a small start up video showing an overlay of the level when it first gets opened.
Credits and thanks (Purchases on Unreal Marketplace)
Before i start adding aspects to the level that are not mine i want to take this time to credit and thank some of the artists and developers who designed aspects that are avalible on the unreal store. I am going to list the marketplace i have purchased while using unreal 4 and the designer who made them.
After looking through some of the learning additions on unreal i discovered a new water effect has been added by unreal. and have chosen to download the package showing the tutorial and the materials and mesh's involved.
Note : Not all content that i have credited might not be used, and the aspects i have used that have included i plan to credit fully at hand in point.
Open world demo collection
Artisit/company - Epic games
Released on 6th April 2015
Preview - N/A
Website -http://epicgames.com/
A free release from epic studios, after release of there kite demo to show off unreal 4. This pack has a range of free assets incredibly usefull for mountain and cliff design including a wide range of foliage and rocks.
Water pack collection
Artisit/company - Epic games
Released on 25th January 2016
Preview - N/A
Website -http://epicgames.com/
A free release from epic studios, a learning tool for developers and containing four different water materials and effects. A brilliant release that epic has given its fans.
A pack of 15 different grass meshes with a total of four five texture sets. A really useful pack containing a variety of grass, and has been my favorite purchase on the unreal store.
Sculpted Rock Pack
Artisit/company - Danny Kauer
Released on 7th March 2015
Preview - N/A
Website -N/A
A selection of nine different scultped rocks perfect for designing cliff and mountain scenes, i chose to purchase this pack as its style was something simular to what i wanted in the native american area.
A selection of nine different scultped rocks perfect for designing cliff and mountain scenes, yet a different texture to the ones created by Danny Kauer due to a light grey instead of dark brown. i chose to purchase this pack as its style was something simular to what i wanted in the Norse area
A clean set of beautiful skyboxes showing a range of spacescapes that vary in color and style, a useful set of blueprints that i want to use in my final project. - due to time constraint issues of time meaning cutting designing of my own.
Game Textures Material pack
Artist/company - GameTextires.com
Released on 12th March 2015
Website - http://gametextures.com/
A range of 31 base materials that can be added to unreal mesh's quickly personally i prefer to make my own textures yet believe it could help in future projects.
CMedia Material pack
Artist/company - GameTextires.com
Released on 30th April 2015
Preview - https://vimeo.com/105457612
Website -http://www.c-mediasolutions.com/
A range of 11 advanced materials that can be added to unreal mesh's quickly personally i prefer to make my own textures yet believe it could help in future projects. Included water effects (a very difficult task) and may be used in my forthcoming project.
VFX Weather pack
Artist/company - Thomas harl
Released on 12th March 2015
Preview - https://vimeo.com/109064378
Website -N/A
A set of 7 particle effects that range for different weather effects, i really like the style of these effects especially the snow and i will probally implement it into my norse area.
Environmental fires Material pack
Artist/company - Thomas harl
Released on 12th March 2015
Preview - https://vimeo.com/108066977
Website -N/A
A set of four different fire effects and a four blueprints for a range of fire effects. The reason i purchased this was it produced a nice quality candle effect, an aspect that i wanted included in this level and in future projects.
These are the purchases and free editions i have added to my content folder into unreal i want to thank again all other artists; and would like to use there creations to create a collaboration of mine and there works. Alongside i would like to also thank Unreal for making an interesting, accessible engine.
Addition of Rocks around level
Addition of marketplace assets
Redesigned assets
One of the big aspects that i wanted to focus on at this point. Was redesigning some assets im unhappy with, the egyptian wall weighing of the heart was one of these assets. I decided to go back and clean up my original artwork of the weighing of the heart, and remade the normal sheet. The effect is alot better, on the right is the old version that i felt was too dark rough, and messy. The clean/new version is shown on the left.
Feedback:
-Overall Very happy with my progress
- Addition of music to flythrough video
-
Framerate Issues
After a while i've noticed my framerate dropped quite largely, after a while i discovered that the foliage brush can lead to a large framerate drop because of this i got rid of alot of my area's foliage and have now started adding specific plants and ferns by hand to complete the scene from here onwards. By doing this i have returned my scene to a normal frame rate. I have also spent today trying to get my level to load at the computers at university yet due to the size of my project, because of this i am going to start deleting aspects from my content folder. To improve management of my project in the hope it will help with transfering my level to other systems.
Ive also started creating my final video playthrough and am trying to upload the first shots and test in matinee, and started sketching out layout for leaflet and dualpage spread, Leaflet Layout
Introduction
Asset list (description reason and design)
Split into areas with area page at start talking about reasons and key story points for area
Unreal Work
Blueprints
Showreel Design
Credits to Thanks for level
2D Print Layout
EasterEggs in area
The area point
Personal View
Special thanks to unreal
Specific Assets and detailed description Max -3
Boat
Mausoleum
Alter
Raised Grave
Now i have completed my level near enough with only some slight changes im really pushing for what my handin and getting the aspects ready. The three i feel i need to focus on right now are the leaflet, dual page spread and matinee actor.
Sound For Video
After looking around for sound bytes that were avalible i discovered one that i really wanted to use, yet the pricing is exstensive, my desired sound footage would of been.
So instead i have settled on a free sound byte from FreeSFX.co.uk I will find a way to upload this Sound byte soon.
Email to Tutor
Dear Mark
Hello,
im just writing to say that i'm really stressed at the moment due to
some factors in my project. Im really happy with my level and i think it
looks really good with my assets and other
peoples; alongside the start of a fly through. Yet i'm having real
trouble with 3 aspects of my level.
Building lighting - Crashes some computers and errors due to a
massive 300Gb memory dump Previous version worked fine yet a foolish
backup now causes it to crash
Packaging size/crashes - The original file of mine is around 50gb with a packaged version of 30GB, i
have reduced that into a smaller package by deleting autosaves and
content that isent used, down to 12 gb. Yet this smaller version will
not package will
not compile and will end in crashes.
Moving folders to uni - i
have tried all week with many different versions getting my level to
work in unreal to show you the other problems. Yet have never got a
small workable package working at uni.
Im still working furiously on trying to get these aspects to work
correctly. Ready for handin and exhibition. Im incredibly stressed with
the whole ordeal at the moment, as i feel like ive invested so much of
myself into this project. I'm wondering weather
it would be better to remake the entire level again, or simply creating
my show reel at home where the project works and keep trying to fix my
issues?
I could really do with some guidance at this point, I hope you are well and less stressed than myself.
I have now compiled, a package project that works at home. With a reasonable package size of 4GB, yet the "lighting needs rebuilt"error still being present. I tried bringing the packeaged version into uni yet got this error message.
As im at the end of the week im going to try and compile it again over the weekend to bring in the packaged version in on monday.
I have also finally managed to get a working editor version of my level working in univestiy, yet i have had to lower graphic settings to achive a smooth framerate. Regardless im incredibly pleased that i got a working version working in University. This is a huge stress off of my plate, and i am very pleased that I finally got a version working.
Yet the lighting problem still persists within the univestiy computers. This is still a massive issue that i am still working furiously to fix. Alongside The pak file being to large to ship. Which seems odd as the file should easily fit on my SD card with a large amount of space to spare.
After my success of getting the project to open at uni i am going to spend my weekend focusing on creating my fly through video at home. While working on my leaflet and dual page spread at university where i have in design available.
Second Email to Tutor
Hello mark
Im sorry to bother you again i just thought i
should inform you. That i have got the project open in unreal, at
university, and i have created a packaged version yet i keep getting an
error when trying to move the packed version onto a memory stick. Saying
the Pak file is too large, which it isn't and should fit on my memory
stick. I'm still having a huge problem with building lighting and
crashing. I have the crash report, yet at this point I'm wondering
weather i should just forget about building the lights and work on the
fly though over the next two weeks?
Yours Sam Betlem
Matinee Video 1
This is my first set of shots that i plan to use, at the moment they are all uncut and will not be used in the final handin. Yet this shows the clear camera paths that will be used. Assets within these shots may change from here onwards, as i want to polish certain parts. I also forgot to disable texture streaming textures which is why textures seem blurred in the video. This should not be the case in the final shot. Other aspects such as lights need to be altered slightly as at points glare is present, a factor i wish to get rid of. In all im happy with the shots I've laid up and will upload a cleaner version of my shots in the near future.
Once i have my completed set of shots im going to take the video shots into a video editor to design two videos, an artist flythrough and a cinematic video.
Two weeks left
I now have two weeks till handin point. The handin submission folder template can be found here.
By this point a range of aspects to showcase my work needs to be Completed.
Learning Agreement (Single scrolling PDF)
Research report (Already Completed)
Online Presence (
Blog (Single scrolling PDF)
Buissness Card Design (Single scrolling PDF)
Leaflet (Single scrolling PDF)
2 Page spread (Single scrolling PDF)
Playable level (.exe)
Ten In Engine Renders (Single scrolling PDF)
Videos: (.mov)
Flythrough video (10 minutes)
Level Trailer
Evaluation (Single scrolling PDF)
Because of this im setting myself a work regime for the next two weeks,
Week 1
Monday:
Day - Leaflet/2 page spread
Evening - Finishing off assets for movie
Tuesday:
Day - Leaflet/2 page spread
Evening - Finishing off assets for movie
Wednesday:
Day - Leaflet/2 page spread
Evening - Gathering shots for video editing
Thursday:
Day - Video and sound concepting
Evening - Video Compiling
Friday:
Day - Video Compiling
Evening - Video Compiling
Saturday:
Day - Learning agreement
Evening - Business Card Design
Sunday:
Day - Compiling level for exe.
Evening - Compiling level for exe.
Week 2
Monday:
Day - Leaflet/2 page spread
Evening - Compiling level for exe.
Tuesday:
Day - Leaflet/2 page spread
Evening - Compiling level for exe.
Wensday:
Day - Leaflet/2 page spread
Evening - Finishing off level for exe.
Thursday:
Day - Evaluation/ Blog
Evening - Folder checking
Friday: - Handin
Few alterations on Egyptian wall
So i still wasent happy with how the weighing of the heart looks so ive spent my night altering it. Adding more gold using satin and inner glow effects in photoshop and tweaking the results.
Successful Lighting Build
I have got a successful lighting build complete now, and reduced objects that need to be rebuilt to 74 down from 4087. The lighting issue was fixed due to lowering some lightmass resolutions on the static mesh's on my foliage brush. Now i can actually see what assets need tweaking when lighting is regarded, because of this success i feel much more comfortable with handin next week.
Video Compiling and production
Today is the day i stopped adding to the level and focus in on videoing and creating a showreel. I have added a few things to the level since my last matinee capture.
Candles around the alter
More buildup of foliage around blank areas
Touching up on weighing of heart wall
Fixing Idols with broken aspects
Slight changes to keyframes
Buildup of logs around Ship
Changes to idols and fixing imperfections
Shadow fixing by changing meshes lightmass
New shots
New video Shots
Ive got some issues with some of these after putting them together in Vegas. yet i have decided that the camera moves to fast at points. Because of this i have decided to go back and change the speed to slow down in various shots. This i think will help with showing off my level and my asset design, also after consideration of my hand in folder im going to create small turntables in a blank level for some of my assets.
Video Editing two days
So I slowed down the shots in Unreal again and compiled two videos in Sony Vegas. The first video is simply uncut shots with fades, to show the level at its fullest. I wanted this to be in my final video to show the level and all the camera paths used to create the trailer video.
The trailer was a compilation with me and Nathan Anthony. We had discussed this project briefly about previously on collaborating to build an atmospheric trailer for the level. The soundtrack we used for the trailer was we discussed layout and story boarding.
We tried to convey a narrative throughout the areas using sony vegas, focusing on level aspects. We are still wishing to tweak parts of the video at this point. Yet keeping in line with my timetable this is the days that i wanted to spend video editing. I have decided to dedicate another day or evening to the video editing.
I have also set up some base turntables of a handful of assets and plan to change the shots in vegas. Overall i'm very happy with the video work and am really happy that i collaborated at this last stage to make the area have a lot more atmosphere.
I have spent today working on business cards and my website, this will be my new way to present myself and have created it using wix. The layout is almost complete with a few changes such as videos to be imported which will come the day before final handin as i am not ready to upload the final videos yet. In all a successful day professionally and brings me closer to my final time as a student and towards a professional.
Building lighting issues on landscapes causing black spots
I have been having an issue with black spots appearing on my landscape and folliage tools i looked around for an explanation on this issue, and found this problem.
It seems that it is a bug with the landscape sculpt tool when scaled, and is an aspect that Unreal is working on, i'm going to adjust the lighting settings to fix this lighting issue. If this is still an issue I'm going to hopefully package two versions one with
built lighting - Some imperfections on shadows
Partially built lighting - Shows error message and how many assets are experiencing problems
This is an issue that has caused me no amounts of stress and time, i find myself very disappointed and frustrated that at this key point this is an issue. I also brought my packaged version into univestiy today to make sure it would run accordingly for hand in. Yet i have found the level to be near enough black. It seems there is either an issue with the brightness and gamma here at univestiy, because of this i am going to alter the light in my packaged project for tonight, and try again tomorrow.
BA7 Designs
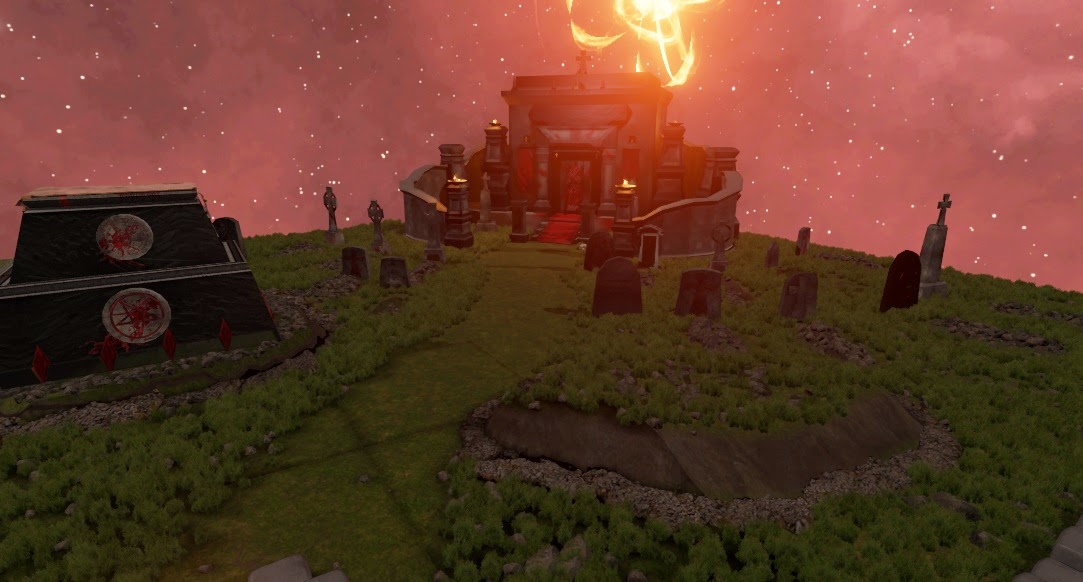
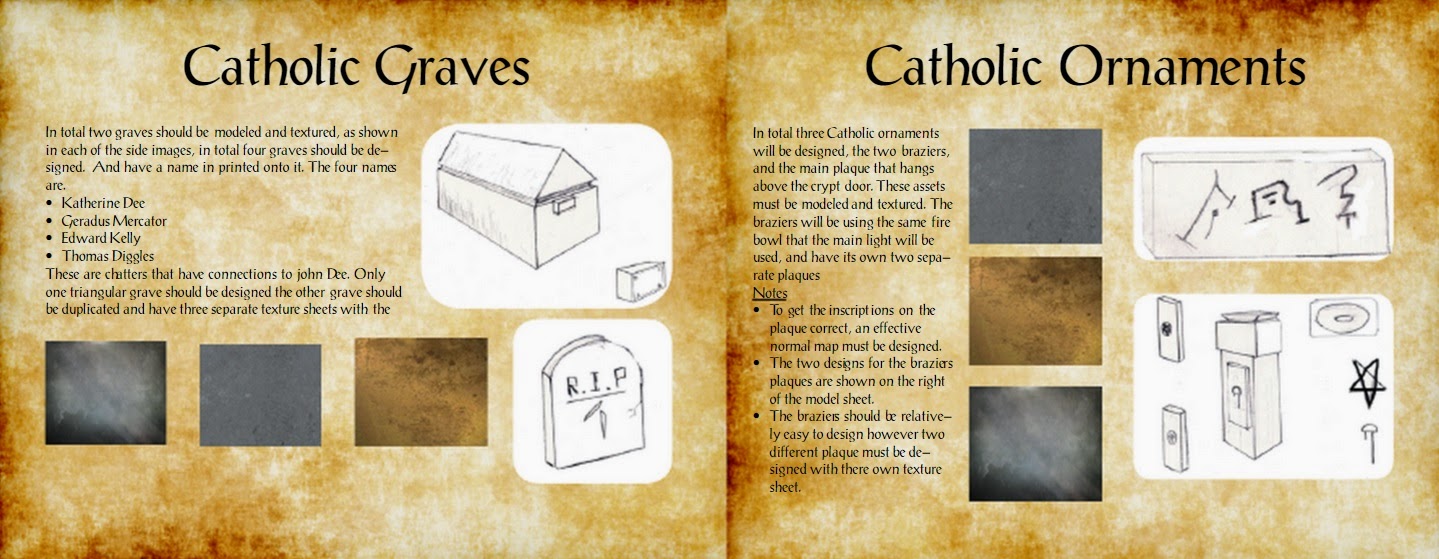
Like my other areas i had a laid out plan of what i needed to design in the catholic area. The assets that i want to complete are:
The Crypt
Catholic grave
Pillars
Due to some base sketches i did in BA7 i already had an idea on what this area would look like,that meant i had a clear concept of the design of the mausoleum and area around it might look like. that would be in my level.
I aslo had made a base layout of what designing the crypt would entail. I ended up changing the materials from this layout to something more set stone and marble as a pose to gold after my brief research into enochian . As i have learnt silver was used more than gold in the occultist christian etticate.
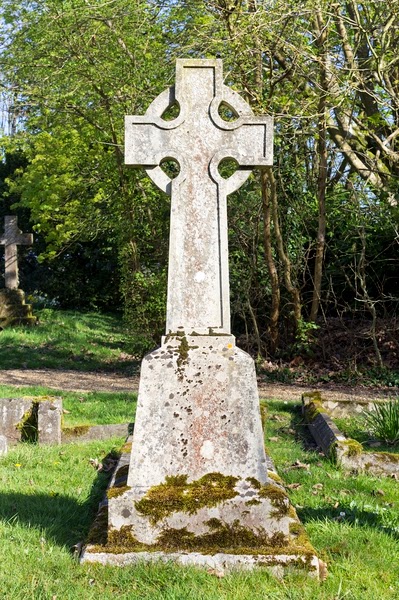
Reference photos
I first wanted to gather some reference for my gravestone design. To help me try and gather some similarities between catholic grave sites i gathered some design concepts, to help gather a variety of designs throughout the area. Though i only am going to spend a few days on these assets as i need to conserve for more time at this point. So reuse of textures and styles may be presnt in the design of these assets.
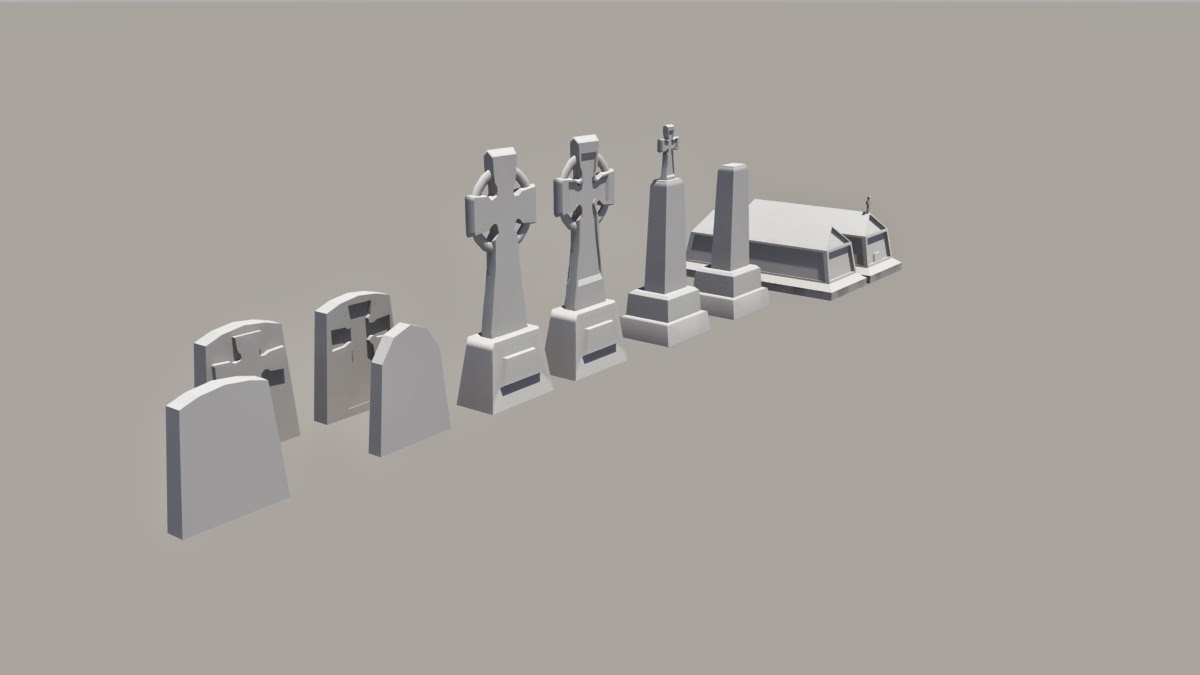
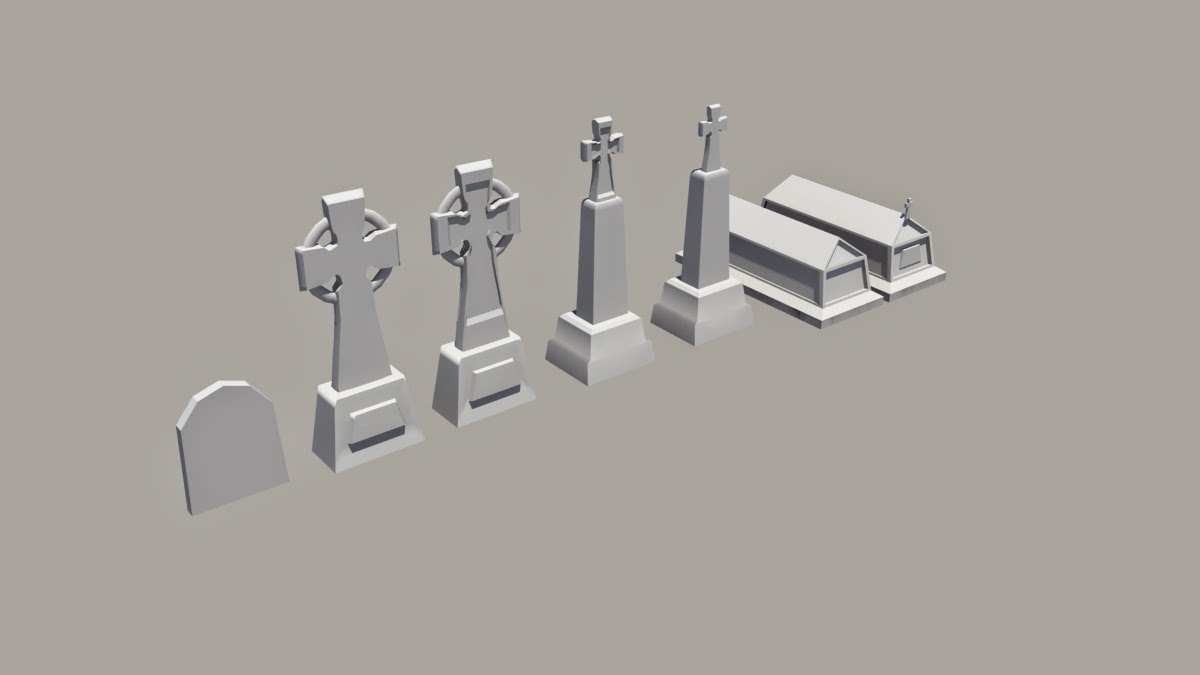
Models
I made these cross graves first, and used paths in photoshop to get the base shape of the cross and then converted the paths to polys and model the asset from there. Once i had made a base i decided to iterate the cross concept further creating indents, ring frames and plaques to go with the base cross grave, allowed for a range of iterations and variations within the model format. Beyond that i also included a range of texture sheet bringing out a whole other range of iterations of these assets.
I then designed some blank square and curved gravestones and also embedded some of these with crosses to have even more of a variety of gravestone
Square grave
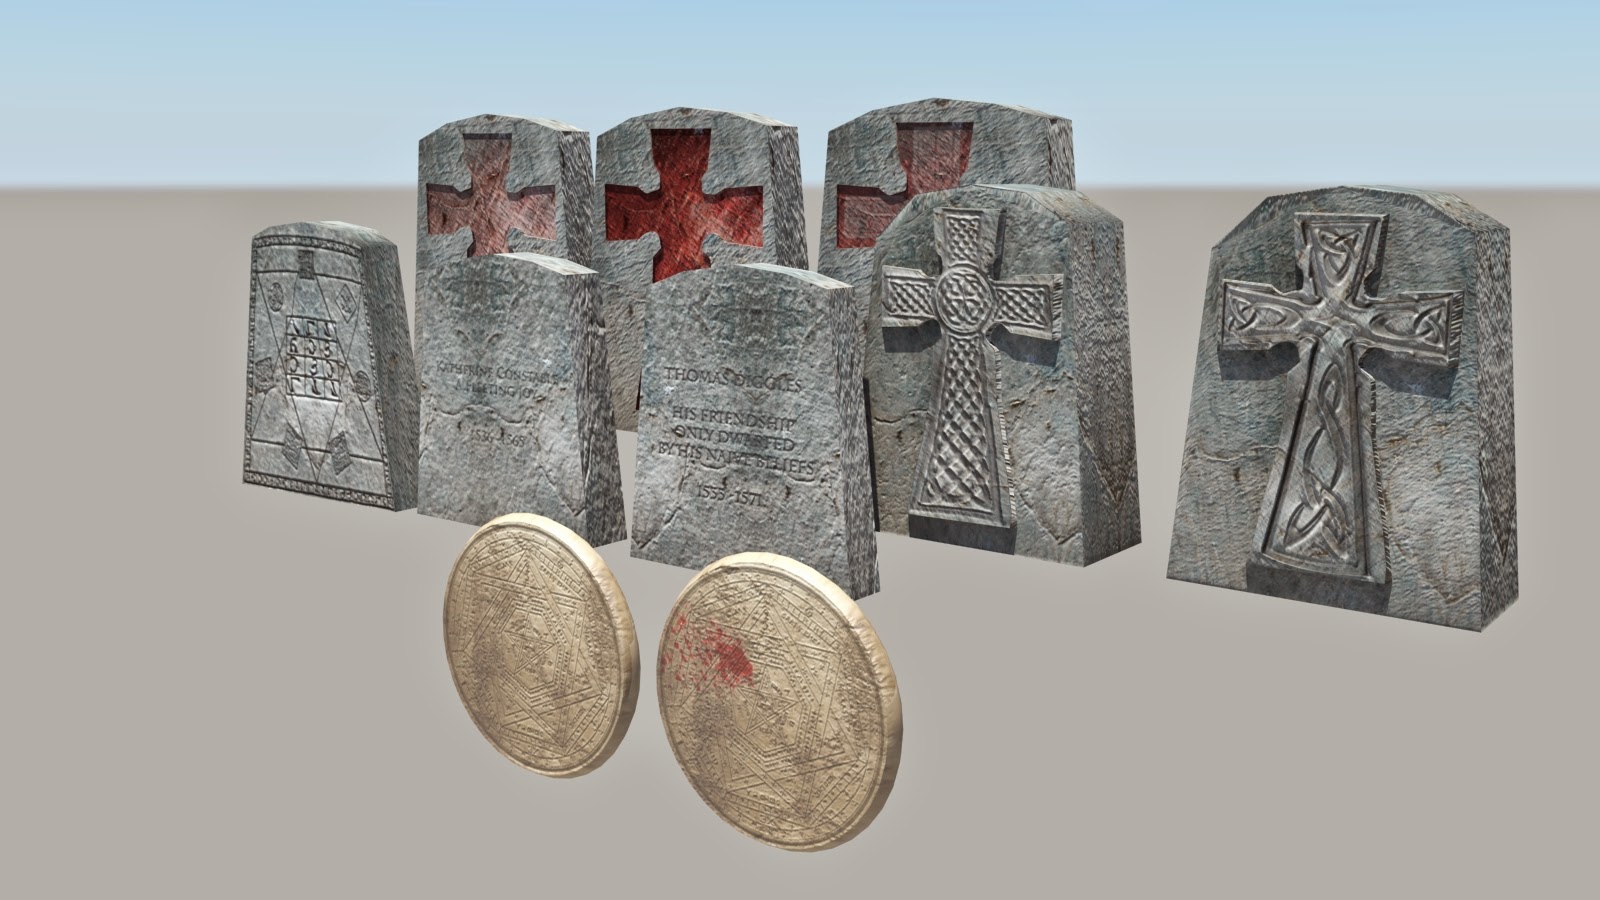
The first gravestone i have made is based off of a magic board that was used by john dee, the magic board was a part of etochian and was used with communing with angelic and demonic forces.
Normal test
Darken texture sheet
Light texture sheet
Soften edges
I firs wanted to see the effecivness of the normal map so i decided to have a render without a texture to make sure the normal map came out on the object effectivly. Once i was happy with bump density and falloff, i added the texture sheet and softened the edges to complete the asset.
Nrm map
No Nrms
I continued to use this technique of checking normals for the other gravestones that had different textures for the same model.
lower intensity Nrm
Enochian and John Dee
After designing the first few gravestones i decided to do a bit more research into john Dee, i discovered a language known as Enochian which Dee actually created in his later life. This unknown about scripture is used for communing with spirits and supernatural beings. And has a wide range of imagery alongside its own alphabet (which i plan to use in the main plaque on the mausoleum. Below is the website where i got most of my research on this topic.
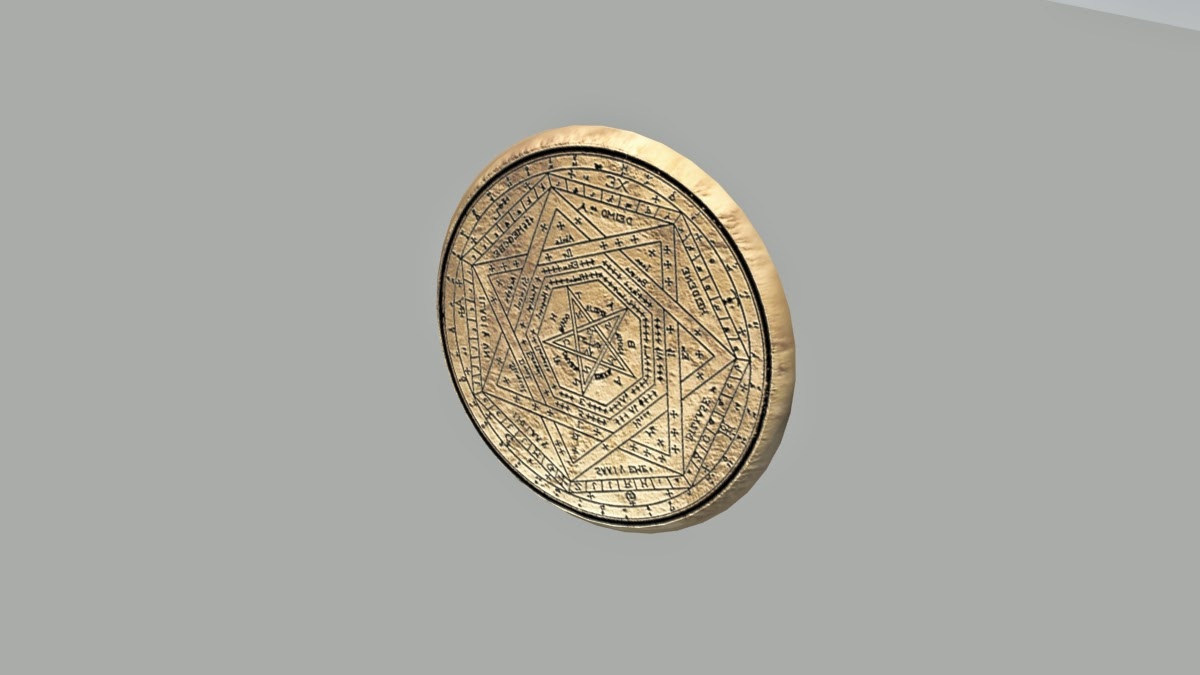
Alongside this research i found a number of ornaments that were kept by john dee, i have decided i am going to recreate one or two of the artifacts and place them subtly within my level. I have also settled on the names that appear on the various gravestones, I choose these either due to rivals or close members of john dee's life, and have created gravestones, using the bases i have earlier, accordingly.
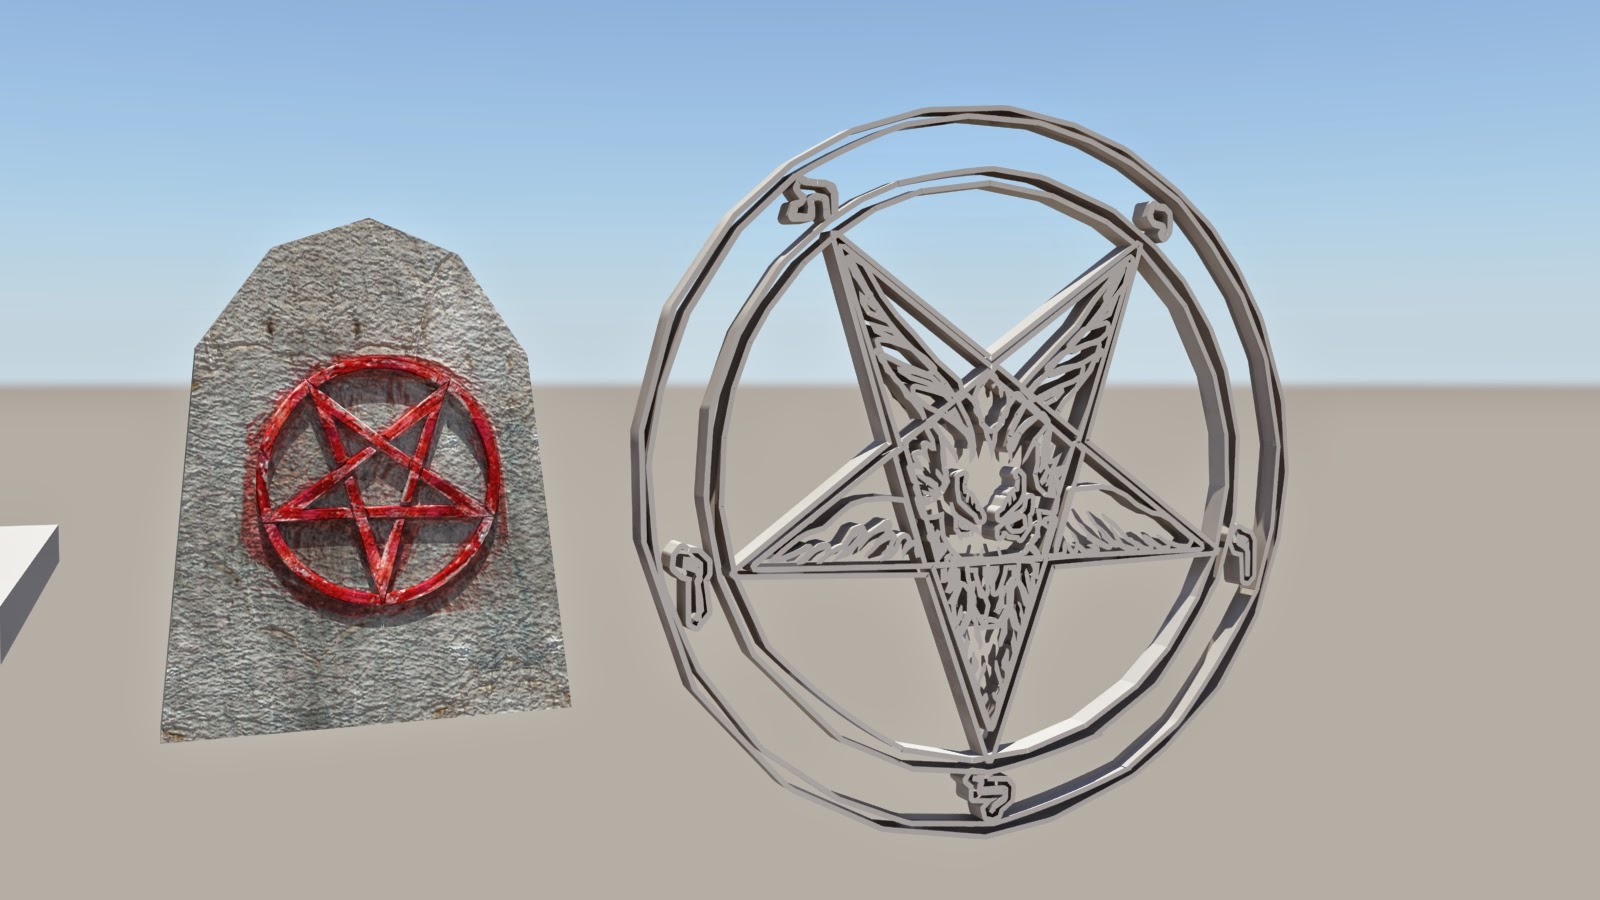
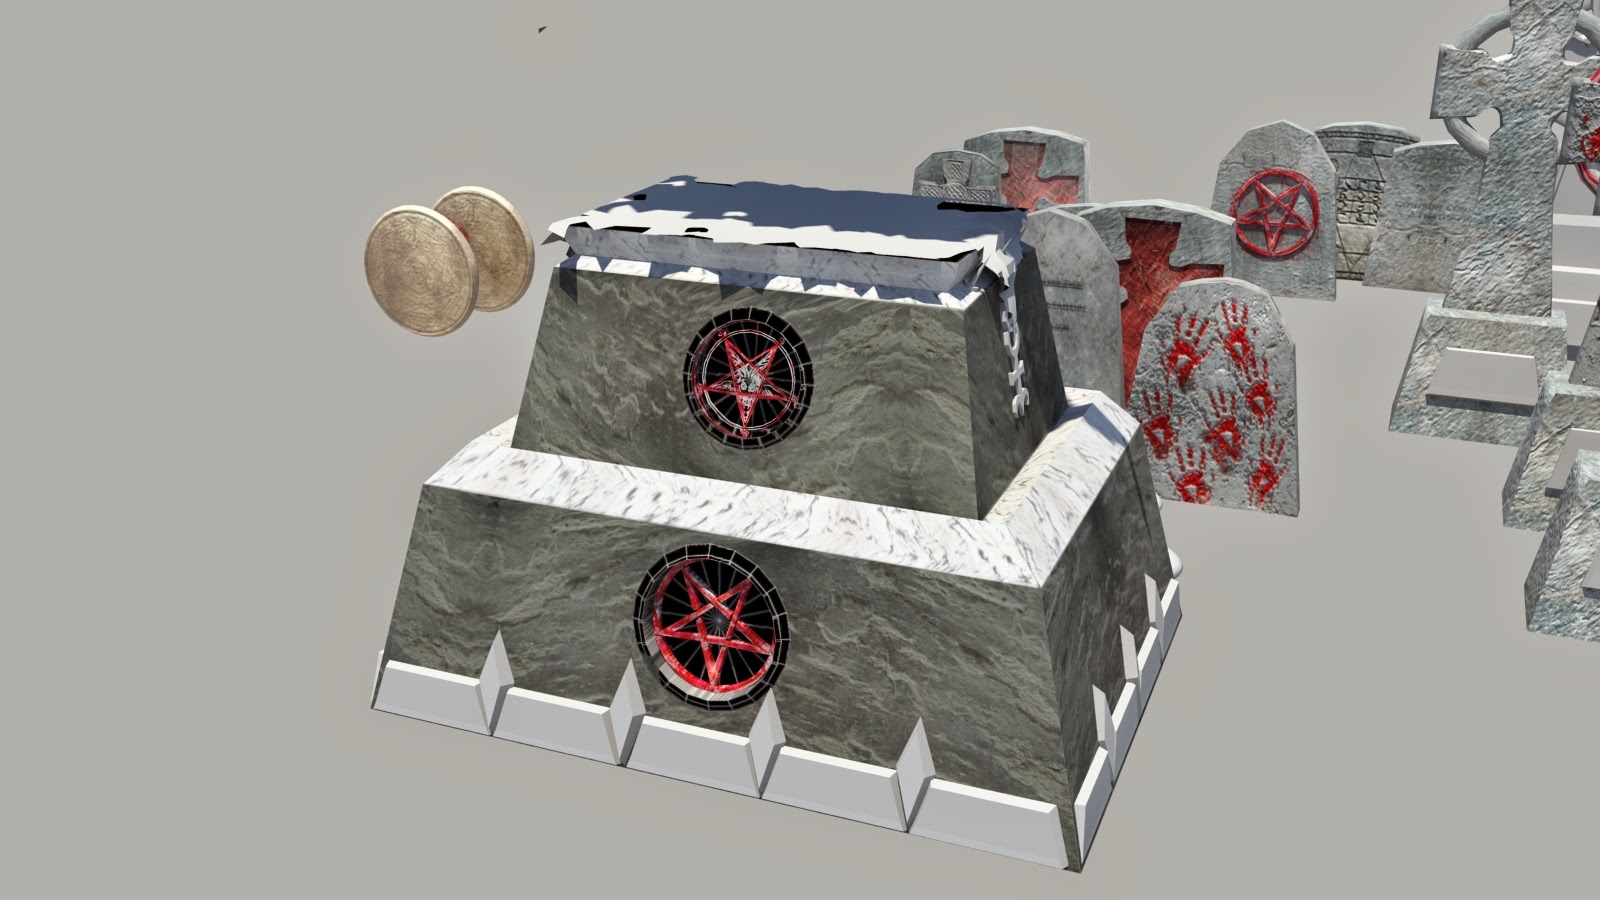
After doing my research on Enochian i decided to add more occult factors into my level such as the pentagram of blood and some other iconic satanic symbols like the symbol of Baphomett, alongside john dees coin inscribed with his most famous ritual icon.
Alter Design
After looking further into Enochian and john dee i decided to design an alter that would fit the setting of this area. This is not part of my orginal idea yet after some feedback from others, it feels like it will be a good addition to the level.
While designing the alter i wanted to have a range of symbolism ranging from john dee symbols, pernagrams and a symbol of Baphomett. During the modeling stage i aslo designed small crystal style objects around the base of the alter. The model only took me an hour to design yet unwrapping the various parts of the alter. When i started textureing i wanted to start with the base and choose to go with a dark rock/slate look.
After looking at the model again i decided that i wanted to add a top to model in the form of a sheet of skin. The skin teture i am going to use is part of unreals marketplace skin. I also added a base marble texture around the border in the middle and top yet later altered it into a more defined edge which really brings the marble seams to life.
Metals and Marble borders
I spent alot of time getting the marble texture that wrapped around the seams effectively. I also started with a gold frame around the main symbols, yet after some more research into enchion i chose to go with silver as it holds more relevance in satanic rituals.
Final touches and Unreal Engine
Finally i added a rock raised path in unreal and tweaked roughness and softness textures on certain objects. (Such as the gemstones specular roughness and metalic input levels) I would still like to add some more features to this asset as i really like it, yet i am still under time constraints and must push forward to complete the mausoleum and have everything ready in unreal.
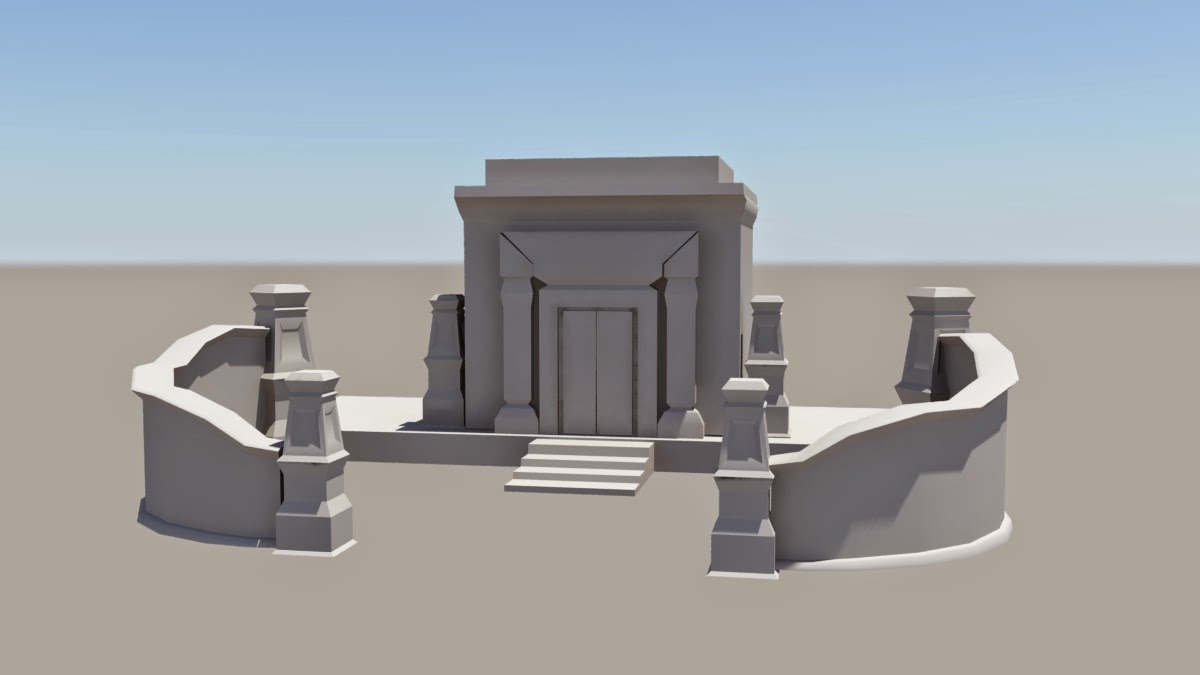
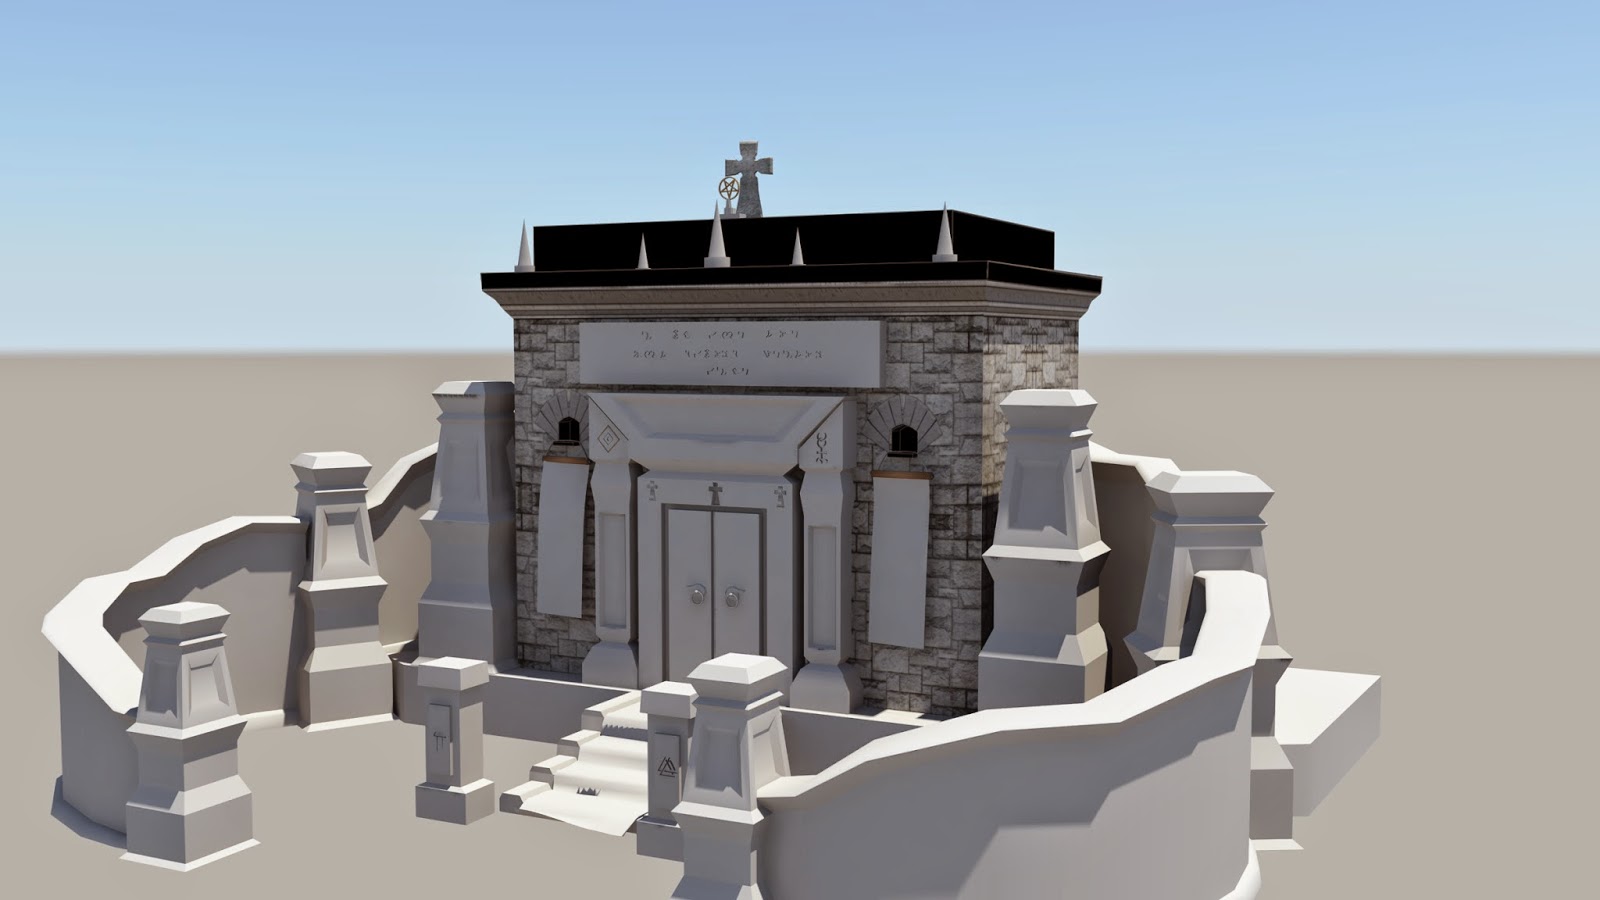
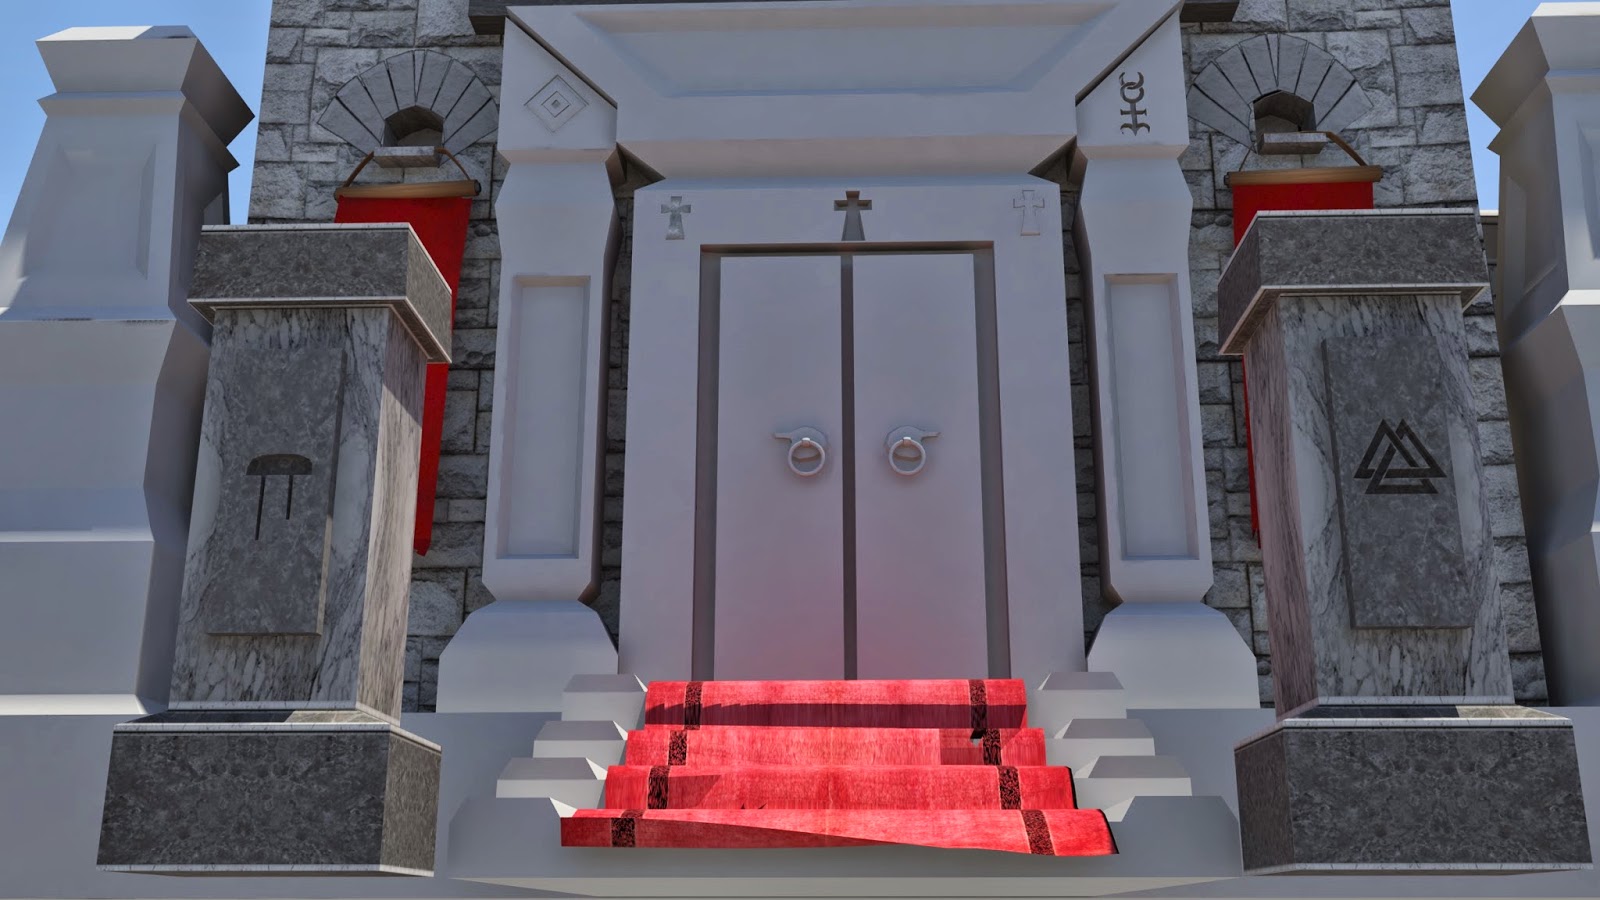
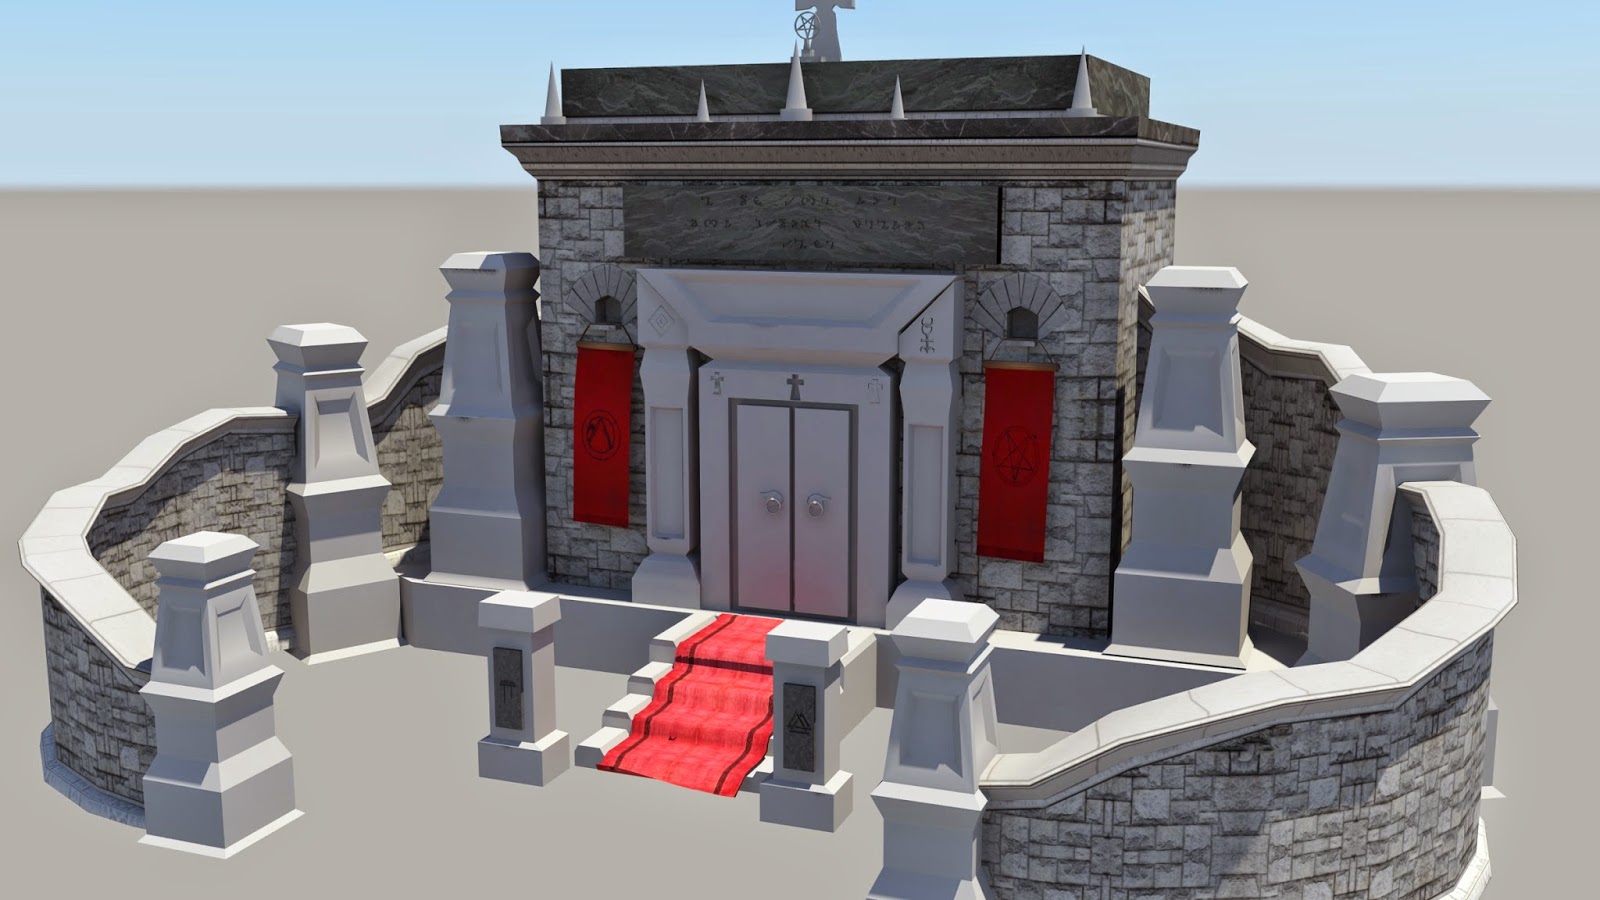
Christian Mausoleum Base Modeling
The centerpiece for this area is the mausoleum, this was my most tricky task and took me around a week to complete. The curved walls were the trickyist part to get right, after desiging a flat version i unwrapped the model and then bent it to the desiered shape. I then designed a main door that i had laid out and some side pillars to add as a brace for the main plaque that was going to be brought in.
The small pillars were designed then duplicated and scaled differently to match areas of the building. I got into the healthy modeling habbit of completeing an asset unwraping it and then moving on. As i broke the model down into sinular pieces it made the textureing stage simlar and more easy to deal with due to my time constrant.
After the main building was added steps were created and added to the base platform, the main plaque was also added and the side walls duplicated into an arch shape.
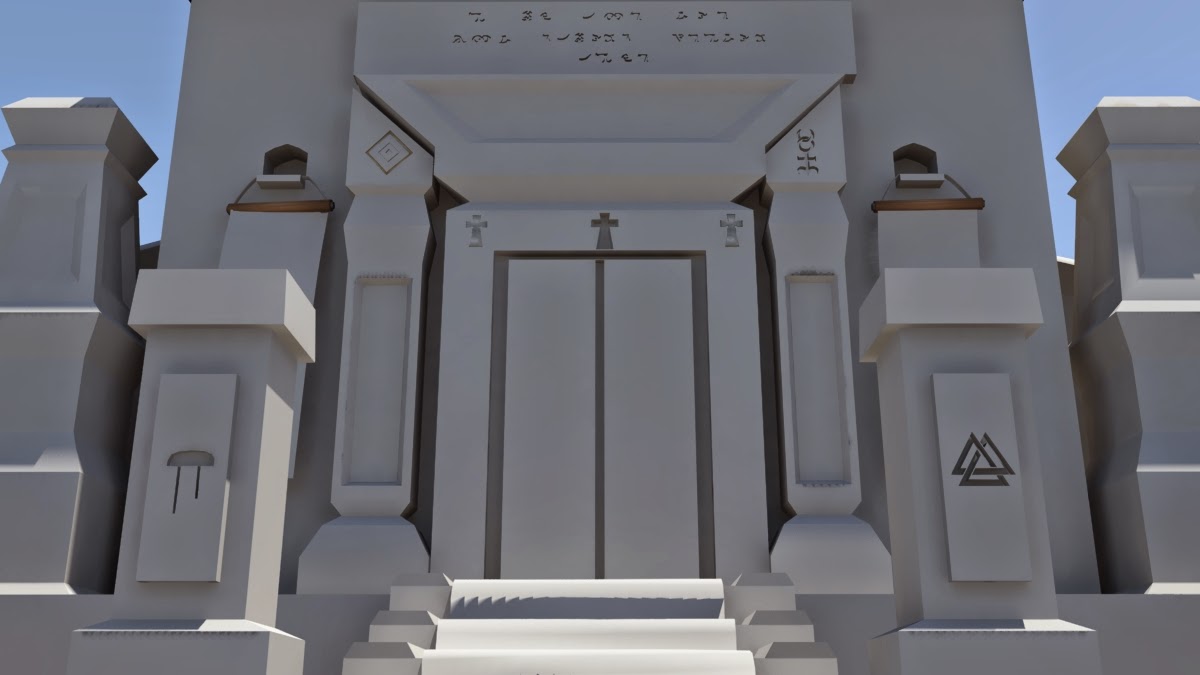
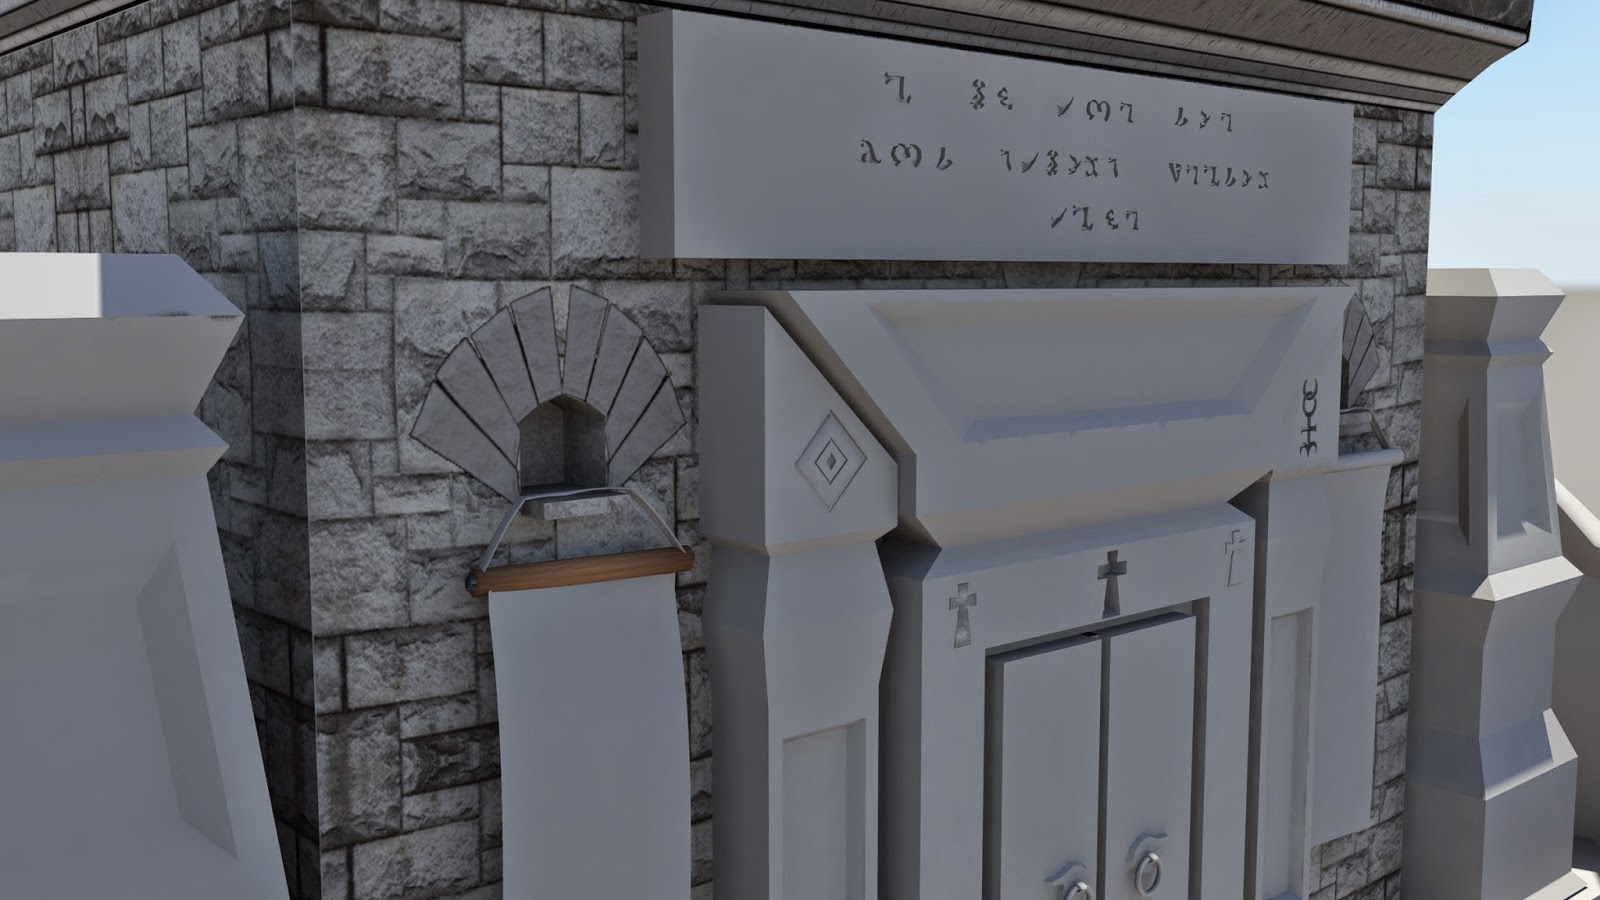
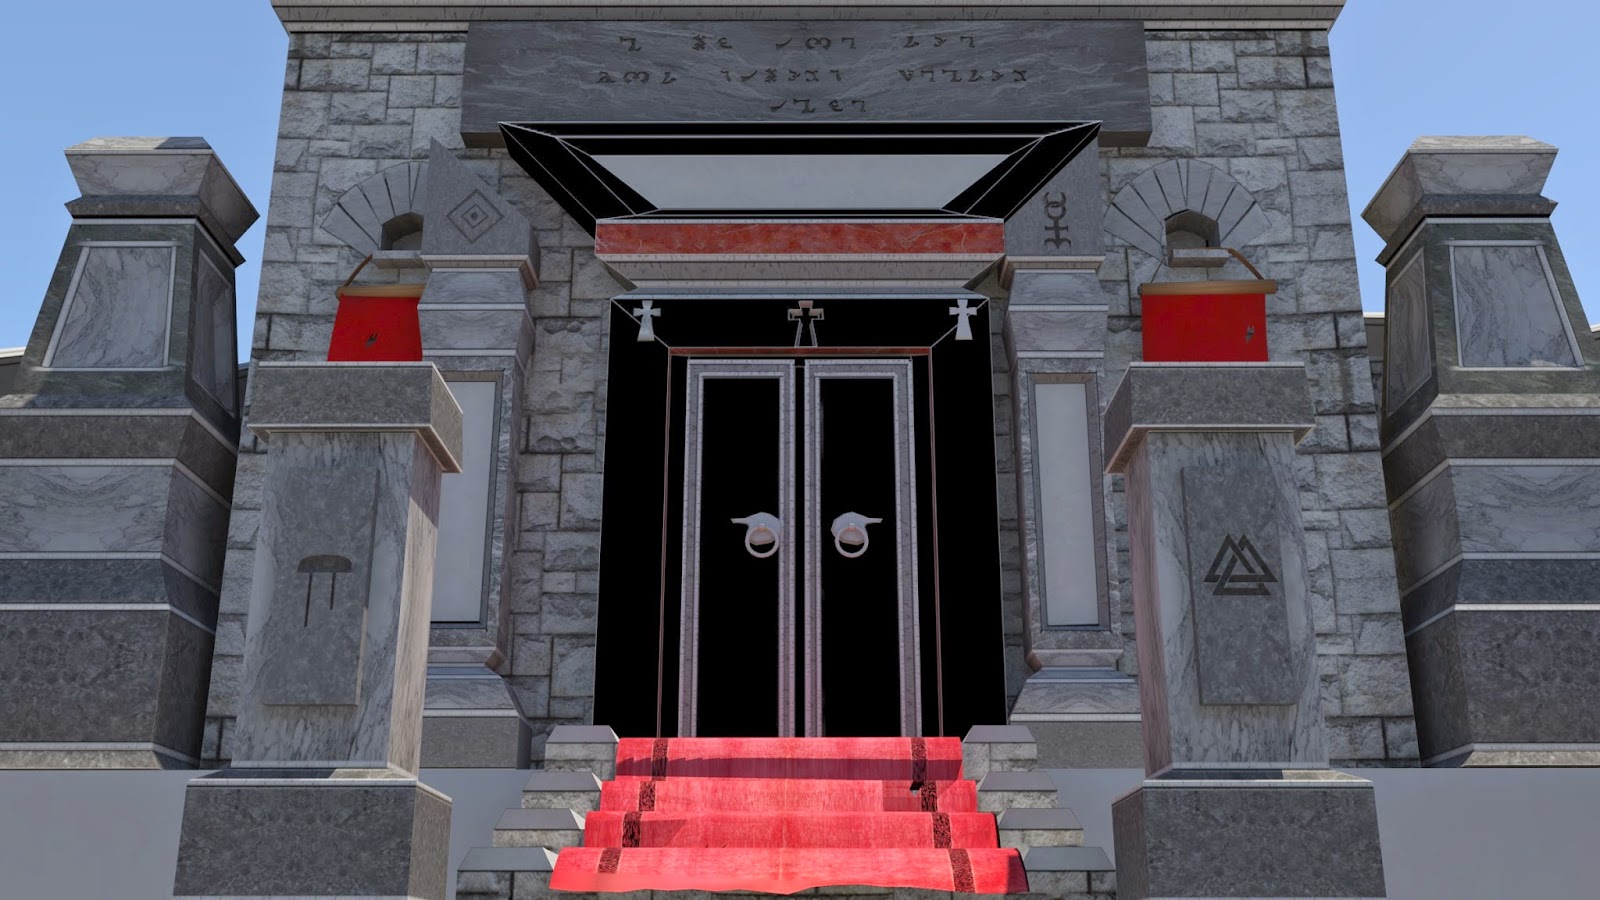
Fine detail modeling and texturing
Now that i had a base layout for my mausoleum i wanted to add some more detail to it. I started by adding a different style of pillars and imbossed a valknut and a Amenia as an easter egg for the other areas.
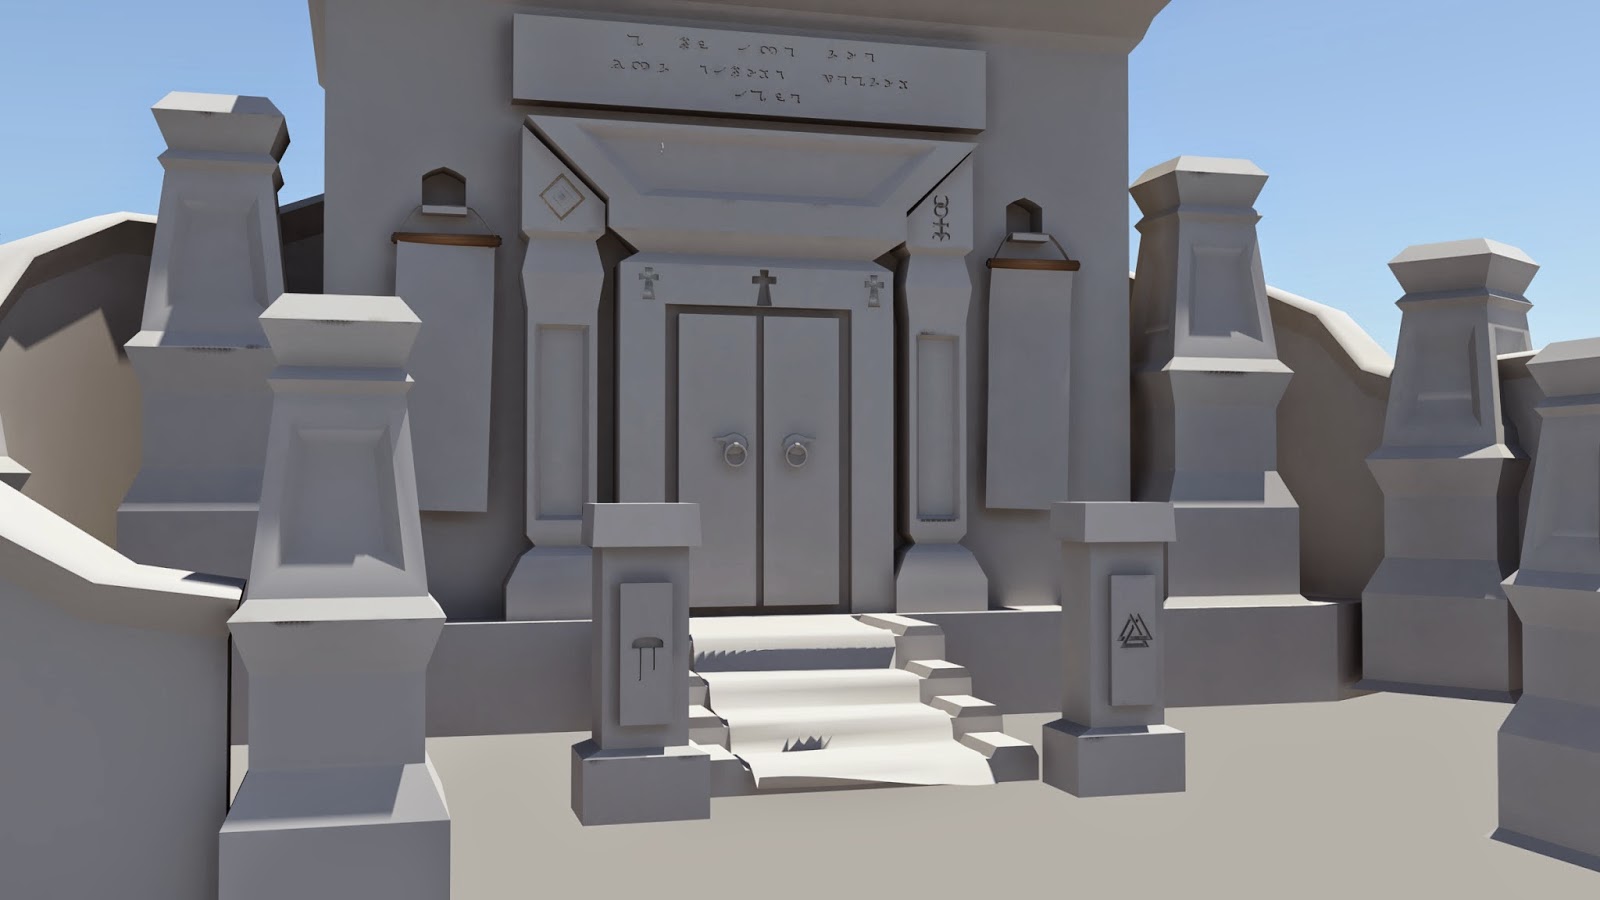
I also added three crosses on the door the center one being engraved inwards whereas the others outwards. - with links to john dees views on christian cross. I also added another easter egg in each pillar one being john dees symbol which he inscribed onto each of his journals and the other being the native american symbol for eternal life.
I also added two ncloth flags, and added indents for candle holders around the top of the mausoleum. This is all part of my design with alterations in the pillar designs however i believe these changes are effective and are an improvemenet on my original designs. I also added a sheet Ncloth that goes over the base of steps.
I also engraved the main plaque inscribed with Enochian the inscription was translated from
"This is my final death before i become the hooded man"
In Enochian it looks like this
Although the full design is not exactly as is it depicted i believe it is an improvement in aesthetics and style, while still follows a clear resemblance of my original concept.
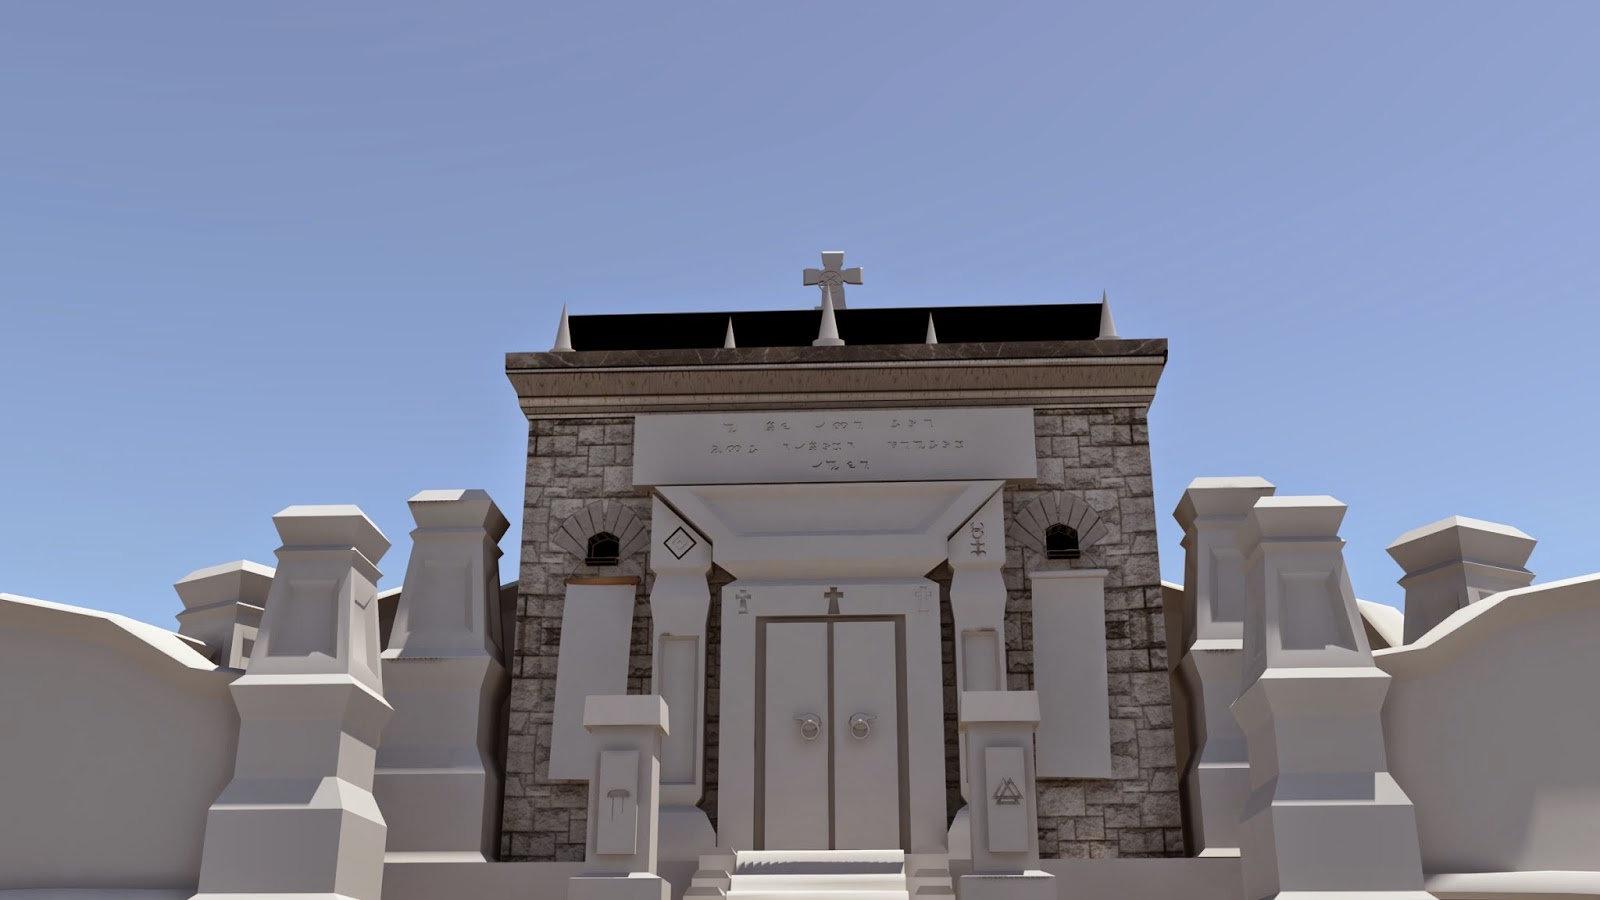
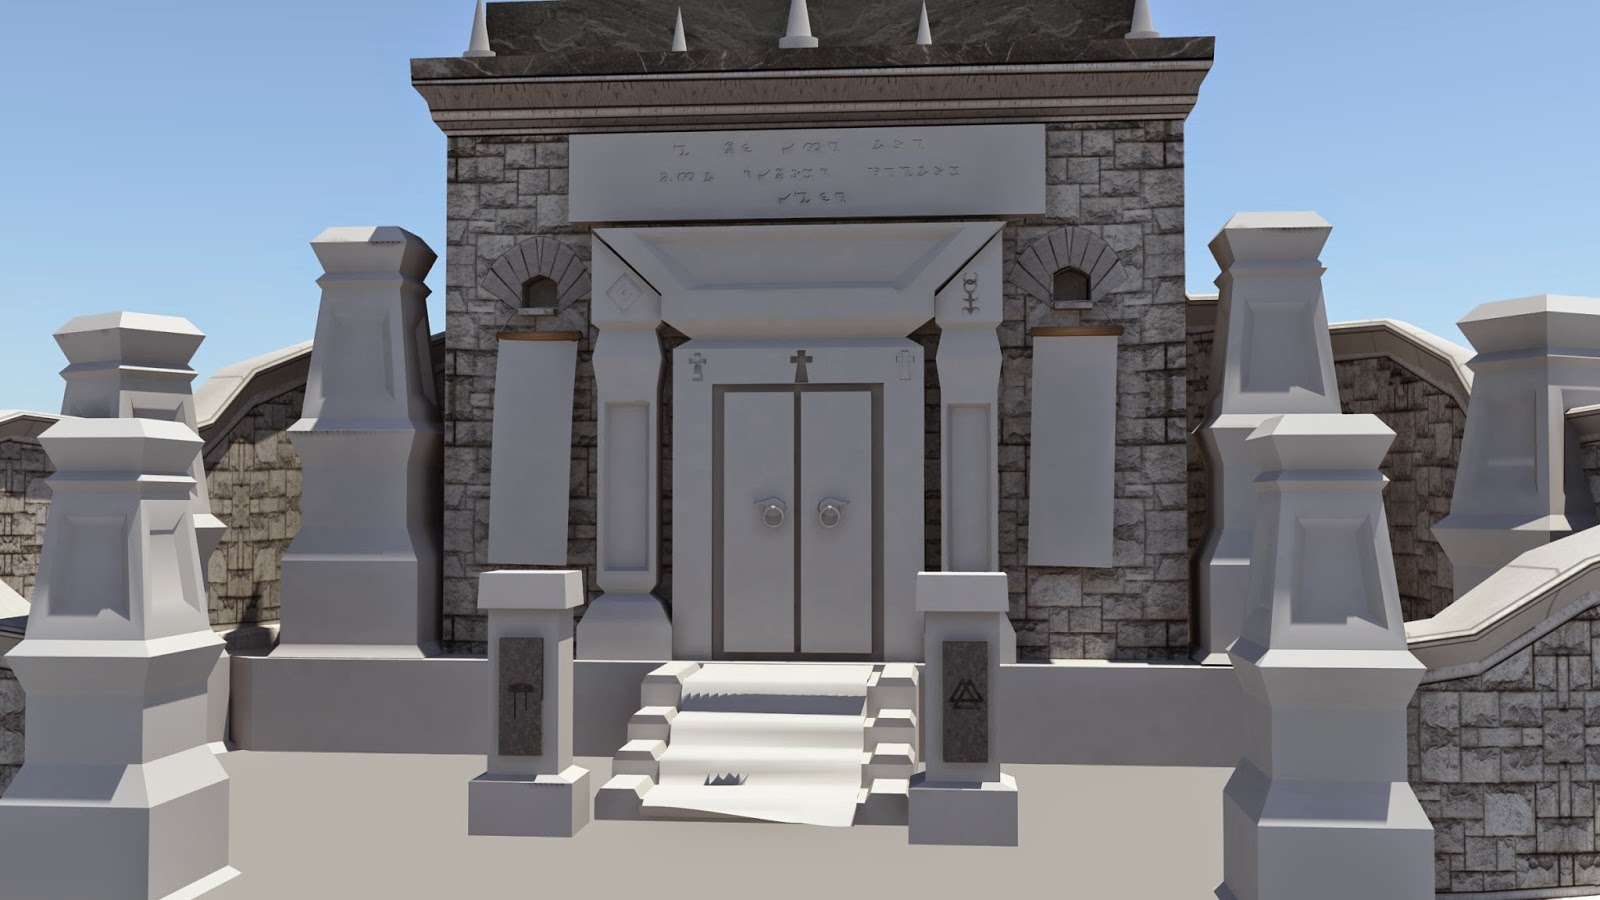
When texturing this asset i wanted to keep in theme with the alter i made earlier, with addition of a new stone material. I decided to go with the same effect as the alter boarders around the top of the mausoleum this was also later added to the walls. Finally adding a marble texture going along the top of the wall
After getting a base texure feel and theme i started adding some more of the detail peices i started with the engraved plaques as i thought they would be easy place to start to gain a feel for texturing. I finally added some more vibrant colors to the scene with some deep reds for the flags and cloth along the bottom. Keeping in plan with the original concept i have kept a pentagram and the nordic earth symbol on each flag. I then started to work on the pillars and doors keeping in line with my marble and stone fashion. I changed the theme slightly when designing the door as i still felt the mausoleum felt too gray and needed some more color
Unreal Version
Blood Version of crypt
I wanted to Create a blood splattered version of this crypt for two reasons. The main being i really like the the clean version and want to reuse it in my future work, and the second being that this is meant to be the darkest part of the characters history where his work drove him mad and he had to discover how to become the hooded figure. To show that i want to create a creepy eerie atmosphere so to keep in line with my original layout of having a "blood splattered crypt" I altered the texture sheets and made new normals for the blood sheets and imported the new model into unreal.


